Winter Wonderland Christmas Tree Skirt

I am so excited to share with you how to make this Christmas tree skirt. I've been wanting to make a Christmas tree skirt for some time now but couldn't find a pattern that was quite what I was looking for. I was inspired by this tree skirt but decided in the end that I didn't want to do appliqué.

Then I had an epiphany, Camille had a mini dwell pattern that would be PERFECT for this and I started to work up some ideas.

I decided that I wanted to have some trees in it as well and Stefanie from Cotton Bliss shared with me a tree pattern that she thought I would like and it was exactly what I was looking for. So without furthermore, let's get started.
Please read through the tutorial first so you understand what you need to do before you get started. This tutorial also assumes you have a knowledge of foundation paper piecing. I will refer you to a tutorial that I have found on how to bind this tree skirt when you are all finished.
This tree skirt measures from point to point about 51 inches and from side to side is about 47 inches.
Supplies:
1-1/2 yards background fabric
1/2 yard border fabric
1/2-3/4 yard binding fabric depending on which binding method you prefer
3 yards backing fabric
batting
batting
Tissue paper to make your wedge template or freezer paper
Translucent Vellum paper (Optional)
3 1-1/8 Cover buttons
skinny elastic
Translucent Vellum paper (Optional)
3 1-1/8 Cover buttons
skinny elastic
** It's hard for me to say how much fabric you will need to make the dwells and trees because I used scrap pieces. So if you do not have scrap fabrics, I would get a charm pack for the dwells, a few fat quarters of green fabrics for the trees and a little bit of brown fabric for the tree trunks.**
From your background fabric:
Cut a 10"x WOF piece and sub-cut that into 4 - 10"x10" squares
Set these aside for the dwell wedges
Cut a 11" x WOF piece and sub-cut that into 4 - 7.5" x 11" rectangles
Set these aside for the tree wedges
Cut a 8" x WOF piece aside and sub-cut that into 4 - 8" x 8.5" rectangles
Set these aside for the tree wedges
Cut 4 - 1.5" x WOF pieces and sub-cut those strips in half to make 8 - 1.5" strips
Set these aside for both the dwell and tree wedges
From your leftover scraps cut
(Try to use your smaller scrap pieces first before cutting into the larger pieces to maximize all of the fabric)
(Try to use your smaller scrap pieces first before cutting into the larger pieces to maximize all of the fabric)
8 - 3.5" x 3.5"
8 - 2.5" x 3.5"
8 - 1.5" x 9.5"
4 - 1.5" x 3.5"
Set these aside for your dwell wedges
4 - 2.5" x 2.75"
4 - 2" x 4.25"
Set these aside for your tree wedges
4 - 2.5" x 2.75"
4 - 2" x 4.25"
Set these aside for your tree wedges
Set all of the leftover background fabric aside. You will be using those scraps to make the trees and mini dwells.
From your border fabric:
Cut 4 - 3.5" x WOF border pieces and sub-cut those strips in half to make 8 - 3.5" strips
Set these aside for both the dwell and tree wedges
--------------------------------------------------
The first thing that we are going to do is make our template for our wedges. I used tissue paper to make my template but one of my pattern testers used freezer paper and I thought that was a great suggestion. If you used freezer paper you would have the ability to iron the template down to the wedge before you cut it out so it would not slip or move around on you when you are cutting it out.

Take your piece of tissue paper and square it up on your cutting mat.

Line your ruler up on the bottom edge of the tissue paper, measure out 23" and mark it.

Now take your ruler and line the 45-degree line along the bottom edge on the tissue paper.

Draw a line up to the 23" mark on the ruler and make a mark.

Now line your ruler up on the markings that you just made on the bottom and 45-degree line and draw a line to connect those markings.

You should now have a triangle shaped wedge on your tissue paper.

Line your ruler up on the marked lines and cut it out.

Now on the tip on the wedge we need to trim off the point. Mark a line on the 3" mark.

Make another mark on the 3" mark along the 45 degree side.
Line your ruler up on the 2 markings and trim away the top.


You should be left with a wedge that look like this.

I would suggest using a different color then your background fabric so that you can easily see your template. I have pictures later on in the tutorial that shows an example. Your wedge should measure 20" on the sides and 17.5" crossed the bottom.
---------------------------
Now you need to make 16 Thimble Blossom Mini Dwell Houses. Since this is a pattern that you need to purchase, I will not be going over how to make these but just follow the instructions on the pattern and meet back here for the rest of the instructions.
**Please note that when you are making the Mini Dwell's that you are using the same background fabrics on the roof and chimney as you will be using for the background of the tree skirt. This is where you could use the leftover background fabric.**
Now that you have your 16 Mini Dwell houses, we are going to assemble the base for the dwell wedge.

Take the pieces that you previously cut and assemble them as shown. Start by sewing together column A, B, & C

After you've done that you should have something that looks like this.
Now sew all of the columns together with the sashing.

You should then have a block that looks like this.
Next we will cut the fabrics for the sides and top of the dwell wedge.

Take the 10" x 10" square and line it up on your cutting mat. Line your ruler up on the top edge of your square and measure in 3.5" and then line up the bottom of the ruler with the bottom right corner and trim.

You should have a block that looks like this after your first cut.

Now do the same thing on the left side of the square.

**I didn't take a picture of this step but trim the points of the 2 smaller triangles off so that the triangles are 9.5" tall.**
Now take those triangle pieces that you just trimmed off and reposition the triangles to the left and right sides on the dwell block and sew all those pieces on. Making sure to center the top triangle with the center of the dwell block.

Now take the 1.5" strip and sew that onto the bottom of the wedge. Make sure to just eyeball it and center the strip with the center of the wedge.

You should now have a wedge that looks like this. Repeat all of these steps to make the dwell wedges for a total of 4.
This wedge is now ready to be trimmed.

When I first cut out my tissue paper, I used a white piece and realized that with my white background, it was difficult to see what needed to be trimmed off. So this is why I suggest using another color.
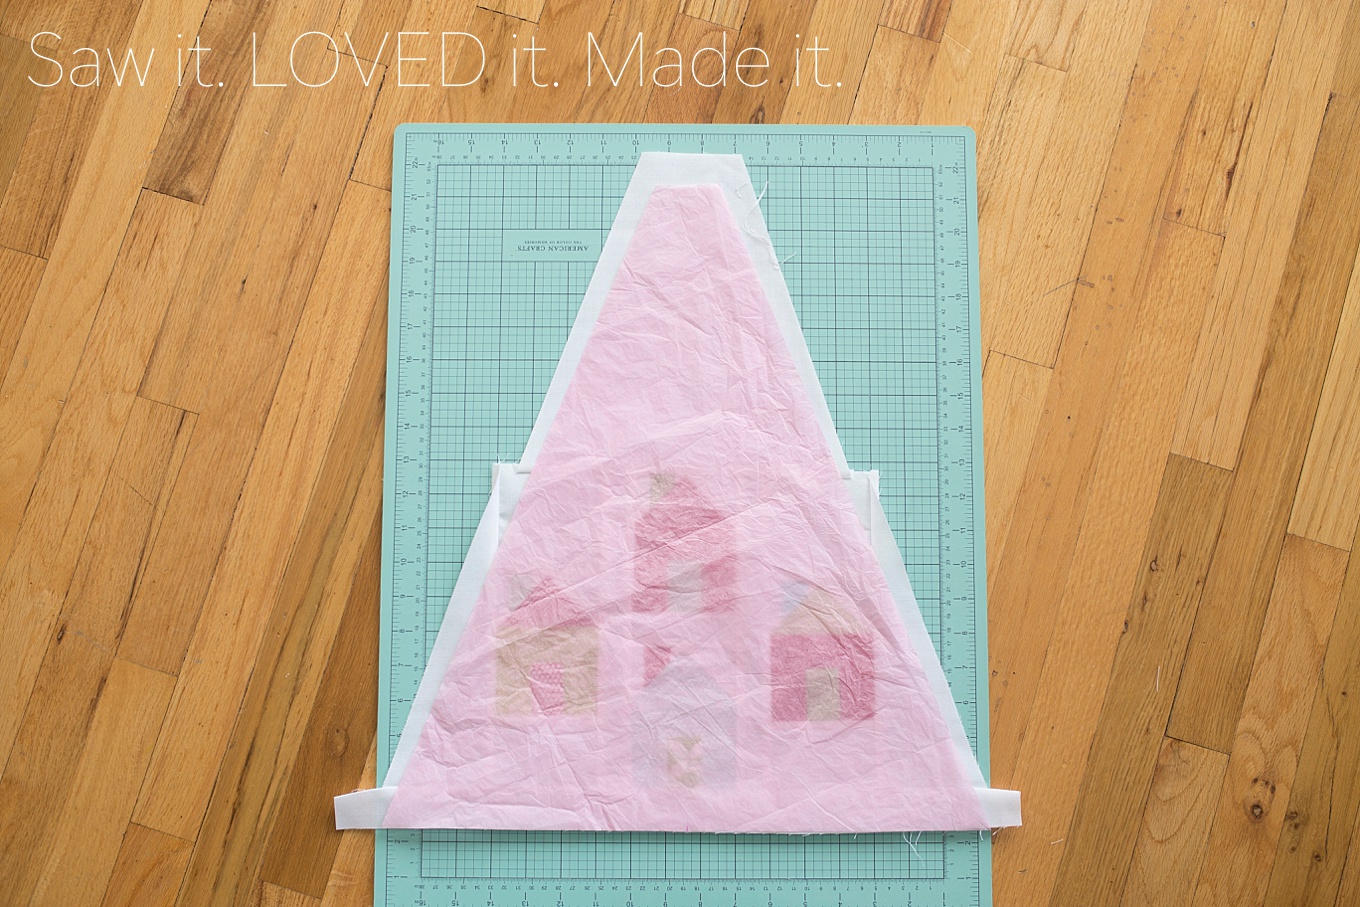
You see how much easier it is to see the background fabric that needs to be trimmed away when I used another color? Make sure to use a tissue paper color that will allow you to see through it so you can make sure that you are centered on your wedge before trimming it.

Make sure to line up the bottom of the template with the bottom of the wedge and just eyeball center the template on the wedge and trim away any excess fabric from the top and sides. If you used freezer paper, you would then iron the template in place, trim it and peel off the template. (I forgot to take a picture of this step on the dwell wedges but I did take a picture of this step on the tree wedges that we will be going over next.
----------------------------------
Making the trees were a bit tricky for me because I really don't have a lot of experience with foundation paper piecing but I am sooooo glad that I pushed through it at first until I got into the groove of things because I LOVE how they turned out. If you are unfamiliar with foundation paper piecing I would recommend reading up on it or watching youtube videos and get a feel of foundation paper piecing. My favorite video is by Vanessa from The Crafty Gemini.
After having to make 12 of these babies, I have some tips and advice to share with you. Instead of trying to show you a zillion pictures, I made a super unprofessional video on my tips I learned along the way. Make sure to utilize your left over fabric when making the trees and cut carefully.

 Next we need to sew a piece of background fabric to the top of the medium and small trees to make it line up with the large tree. Take your background pieces that you previuosly cut out and sew them onto the tree as shown. Once the background piece is sewn onto the tree tops, stitch them all together to make the block as shown.
Now we are ready to assemble the tree wedges.


Center the border pieces along the bottom of the wedge and sew it into place leaving the extra amount over the edges to be trimmed.


 Be warned. There are a lot of corners to bind and I am terrible at corners.


----------------------------------
Making the trees were a bit tricky for me because I really don't have a lot of experience with foundation paper piecing but I am sooooo glad that I pushed through it at first until I got into the groove of things because I LOVE how they turned out. If you are unfamiliar with foundation paper piecing I would recommend reading up on it or watching youtube videos and get a feel of foundation paper piecing. My favorite video is by Vanessa from The Crafty Gemini.
After having to make 12 of these babies, I have some tips and advice to share with you. Instead of trying to show you a zillion pictures, I made a super unprofessional video on my tips I learned along the way. Make sure to utilize your left over fabric when making the trees and cut carefully.
(I said "so" and "umm" way too many times in this video. I live by an Air Force Base and hearing the airplanes is so second nature that I didn't even notice them flying around until I heard it on the video. Sorry.)
It is very important to make sure that when you print your tree pattern, that it prints to scale. My printer at home prints the trees perfectly but my work printer, as well as some of my pattern testers, were printing out smaller. So you would just need to change your printer scale, little bit by little bit until the 1" gauge is measuring exactly 1" square. Stefanie has updated the file to have 3 different tree sizes. If you have downloaded the file previous to this tutorial, you will want to download the latest file update. You can either sign back into your account, go to previous orders and download the file again. If you did not create an account, you can just download the file again.
You need to make 4 Large, 4 Medium, and 4 Small trees for a total of 12 trees.Your unfinished trees should measure
L - 11" x 3
M- 8.75" x 2.5"
S- 7.25" x 2"
Now we are ready to assemble the tree wedges.
Now you need to take your 7.5" x 11" rectangle and line it up on your cutting mat. **
Line your ruler up on the top edge of your rectangle and measure in 1.5" from the top left corner and then line up the bottom of the ruler with the bottom edge of the rectangle and measure in 1.5" from the bottom right corner and trim.
**If you have a background fabric that has a right and a wrong side you will want to make sure to cut 2 - 7.5"x11" pieces at the same time but with wrong sides together so that you will have a left and right piece cut out.**
Reposition the triangle pieces on either side of the tree block. First sew the triangle pieces onto the tree block, followed by the 8" x 8.5" piece on the top making sure to center and sew the 8.5" side of the rectangle to the center of the tree block.
Sew the 1.5" strip into the bottom of the tree wedge and make sure to just eyeball the center of the strip with the center of the wedge.
This wedge is now ready to trim. Make sure to line up the bottom of the the template with the bottom of the wedge and center the template. Again, if you are using freezer paper just iron it in place.
Line up the edge of the ruler on the edge of the template and trim away the sides and top.
Repeat all of the steps for the tree wedges so that you have 4 wedges in total.
By now you should have 4 dwell wedges and 4 tree wedges all trimmed and ready for the border piece.
Center the border pieces along the bottom of the wedge and sew it into place leaving the extra amount over the edges to be trimmed.
Your wedges should look like this.
Now we need to cut off the extra border piece by lining up the edge of the ruler along the edge of the wedge and trim off the extra border.
Repeat the steps to attach and trim the border piece on all of the wedges.
From here you just need to sew all of the wedges together alternating between a dwell and a tree wedge. Start sewing at the border and working your way towards the center. Make sure to handle your wedges will care because the wedges are cut on the bias, they can easily get stretched and wonky. If you like to spray starch when you iron, this would be a good idea to help hold the fabric from stretching.
I made a total goof mistake and didn't have the memory card back in my camera and I don't have pictures of some of the steps that I wish I did but lucky I did take a few pictures with my cell phone along the way. So this is the only photo I have as I was attaching the wedges, with just two more left to add on. When you make your way all the way around, don't sew the last edge. That will be the split for the opening.
You may feel that the circle opening in the center is too small and needs to be larger. I did make mine a bit larger. If you feel that way, you can certainly make that opening larger but I would do that step after you have already quilted the tree skirt and before you attach the binding.
Make your quilt sandwich as you normally would with any quilt by layering your backing, batting and Christmas tree skirt. I didn't bother cutting a slit or hole in the center of the backing or batting at this point. Baste it using your preferred method and quilt it as you wish.
If any of you are nervous about quilting, don't be. This was my first free motion quilting that I have ever done and I am so proud of myself. It has a few areas that are frightening but all and all, I am happy with how it came out. Practice Practice Practice.
Once your quilting is finished, trim off the excess batting and backing around the tree skirt and trim up to the center of the skirt along the seams that have not been sewn together. Trim around the center and if you need to make the center hole larger, do so now.
Now you are going to make 3 cover buttons and just follow the instructions on the packaging. You will also need to have 3 pieces of elastic ready to be attached to the back of your tree skirt at the same time you are binding.
Now you just need to bind the tree skirt using your preferred method. I had a handful of my pattern testers who asked about using bias binding and I did not do that because I did not have enough material to cut my fabric on the bias. Having the binding cut on the bias would make sewing around the circle in the center easier. I was able to make it work just fine without cutting on the bias. If you did want to use bias tape binding you can google or look up tutorials on Pinterest.
I like to cut my strips to 2.25" but I know some people prefer 2.5". I found a tutorial by A Bright Corner on how to attach the binding to a tree skirt and it goes over it perfectly. I attached the binding to the top of the tree skirt.
Before you sew down the binding to the edge that opens up to the center of the tree skirt, you need to figure where you want to place your elastic loops to loop around your button covers.
This picture was taken after I had already turned the fabric over and bound it but you get the idea.
Be warned. There are a lot of corners to bind and I am terrible at corners.
Once you have finished binding your tree skirt, you just need to figure out where you need to place your button covers based on where you placed your elastic loops. Line up your edges for the opening and your button covers need to be sewn onto the opposite edge that you have the loops.
Now just sit back and enjoy your masterpiece.
I really hope that you guys like this tutorial and I look forward to seeing your tree skirts. Check out how others have made their Winter Wonderland tree skirts.
Jessica


This is amazing! I can't wait to get started on mine! <3
ReplyDeleteBeautiful tree skirt and great tutorial. Thanks for taking the time to do the post. Looking forward to making one once I get those patterns.
ReplyDeleteThis is darling!
ReplyDeleteLove this
ReplyDeleteWould love to make this, however, have not been able to download the tree patterns. Seems they are not available.
ReplyDeleteI love this tree skirt and would love to make for this holiday. Can you tell me how big it is when finished? janicelashley@gmail.com
ReplyDeleteI can't access the Wonky Skinny Tree pattern. Where can you download the pattern?
ReplyDeleteI can’t find the pattern for the trees either. The houses are at the fat quarter shop. But we all need the trees! PLEASE, let us know where to find them!
ReplyDelete